How to Make a Baby Gift Out Shoe Box
Hello Daydreamers!
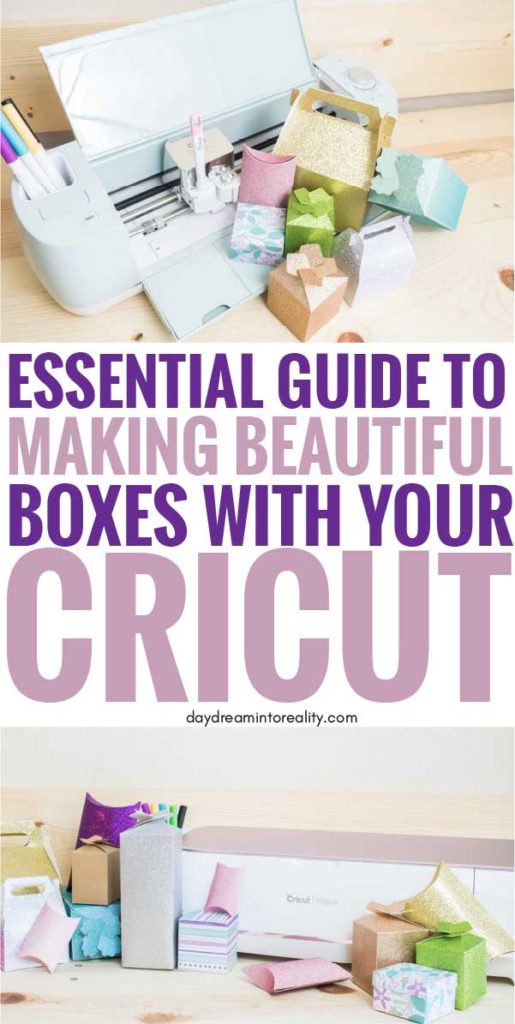
Today, you will learn how to brand the most beautiful boxes with your Cricut Maker or Explore car.
I am and then excited to bring you this postal service!
I thought information technology would take me forever because I wanted to ensure that all boxes were perfect apropos measurements, mode, and materials. And to exist honest, time is something I don't have a lot of right now.
But…
Guess what?
My Super Dad, an expert in Math, Geometry, and spoiling his well-nigh thirty-year-old babe girl lol, stepped in and said he was going to help me bring you the most amazing and beautiful designs for boxes.
Y'all WON'T find these templates anywhere, so shout out to my dad, who made this article possible!
If you lot are a beginner and are however figuring out Cricut'south software, I recommend that y'all read my fantastic andUltimate Cricut Pattern Space tutorial.
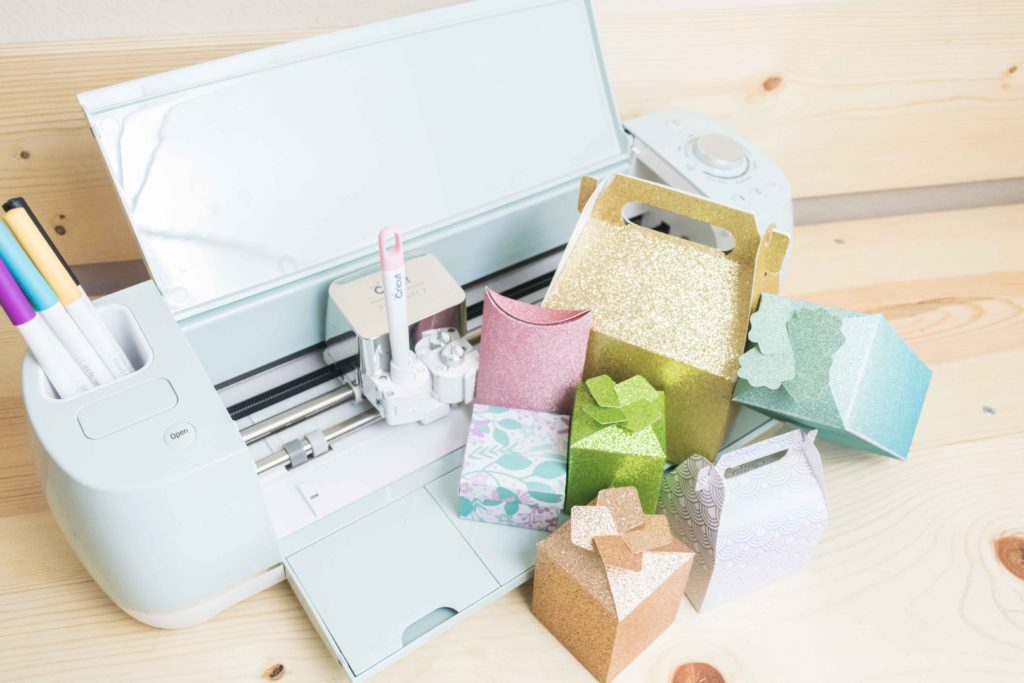
Tools & Materials
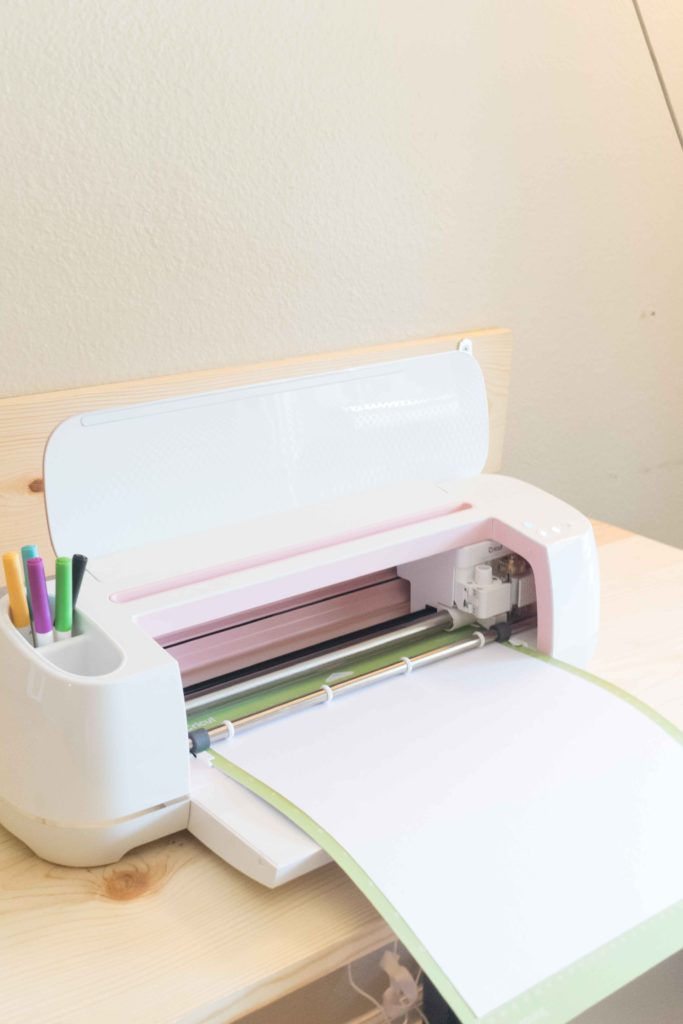
- Cricut Automobile (Maker, Explore)
- Light-green Mat
- Fine Betoken Blade
- Scoring Stylus or Scoring Bicycle (Maker simply).
- High-quality glue*
- Cardstock**
- Practice File (You can download it, righ downward below, at the end of this tutorial, y'all'll find the other 5 templates)
* Always use loftier-quality gum when making cards or a professional project. Kids' gum volition make your paper wet and bubbly once information technology dries. I always recommendBeacon 3-in-i, although Crafter's tape or a glue pen will work as well.
** For boxes, I recommend using cardstock. Regular newspaper is fragile, and your box won't be sturdy plenty.
Echo after me. I will simply use high-quality paper, and cheap paper will brand cheap-looking projects. Michael'southward has a bang-up selection of beautiful papers, and they also go on sale, so make sure to keep an center out for those expert deals.
Making Boxes with Cricut – Should you start from Zero?
If you've read some of my other manufactures, I am sure you lot know that I Beloved didactics you the logic process and how things work in Cricut Pattern Infinite.
I am a massive fan of creating things from zero and teaching you how to do them all independently. However, at that place are moments when nosotros must draw the line to focus on what matters, and that is a beautiful end product.
Cricut Design Space is a great way to come up with custom designs, but I noticed that someday I needed something verbal, it didn't work that well for me, so that is why I decided to provide y'all with templates and non a how to do it stride past step within the software.
Now that we got that out of the fashion let'south brand some boxes!
Make boxes with your Cricut – Step by Step tutorial
There are half-dozen different templates that I have included in this tutorial (detect them at the end of this tutorial).
Yay!
For this article, I will only explicate the pace-by-footstep inside Cricut Pattern Infinite for the virtually circuitous one. Therefore, the other templates will be just a walk in the park.
After going through all of the Cricut Design Space steps and cutting process, I will take a stride-by-step tutorial on how to gather each box template.
Upload Box Template to Cricut Design Space
Log into your Cricut Blueprint Space account and click on "Upload," located on the left panel of the canvas area. One time yous are there, click on the Upload Image button, choose the template from your computer, and salve information technology to Cricut Design Infinite.
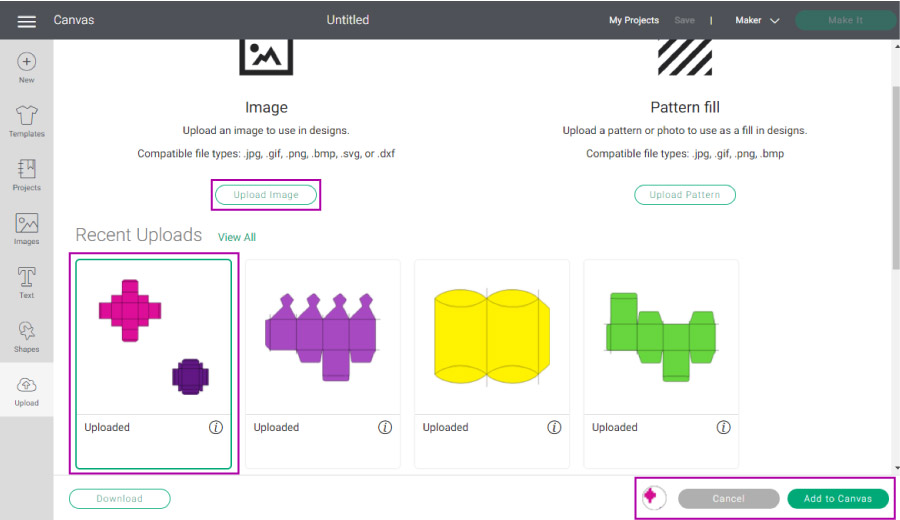
After you lot consummate those steps, the template will exist located nether "Recently Uploads." Select information technology, and and then click on "Add to Canvas."
Agreement the Template and Getting it Fix for Editing
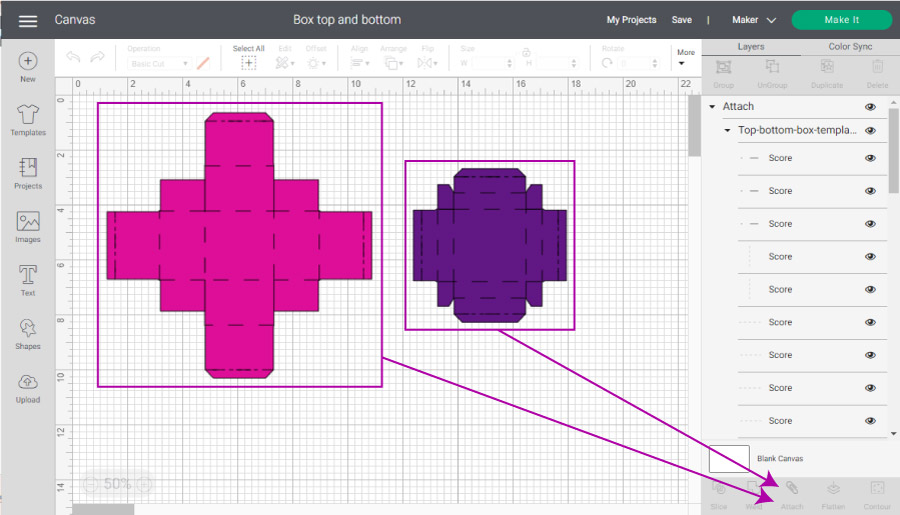
Since this is a "Superlative" and "Bottom" box, you will have two pieces: the lesser one (the big piece), which is for storage, likewise as the top one (the small slice), for the encompass.
When yous insert the file, both the top and bottom parts are grouped. Since we need to work on them individually, select them and click on "Ungroup," located at the top of the layers panel.
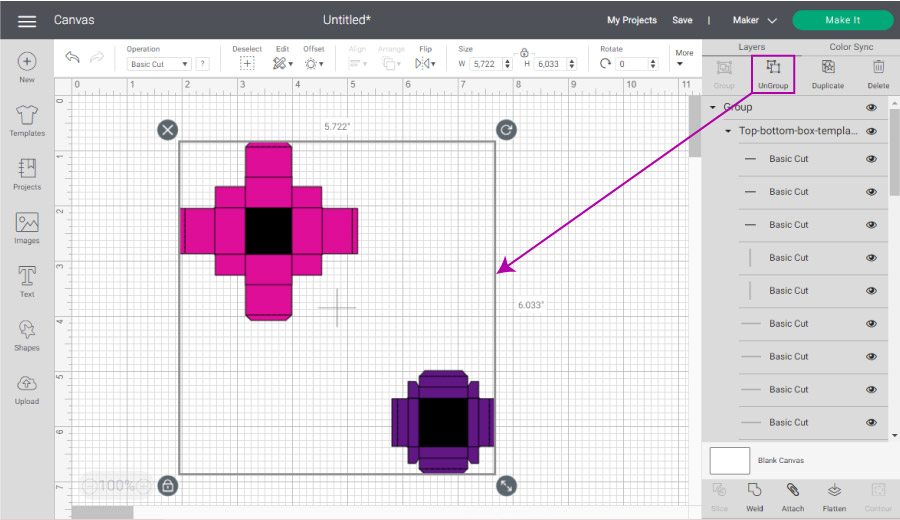
Only ungroup one time. The other groups left are there to help you to edit things faster.
Learn more than about Group, Adhere, and weld on this excellent guide I put together.
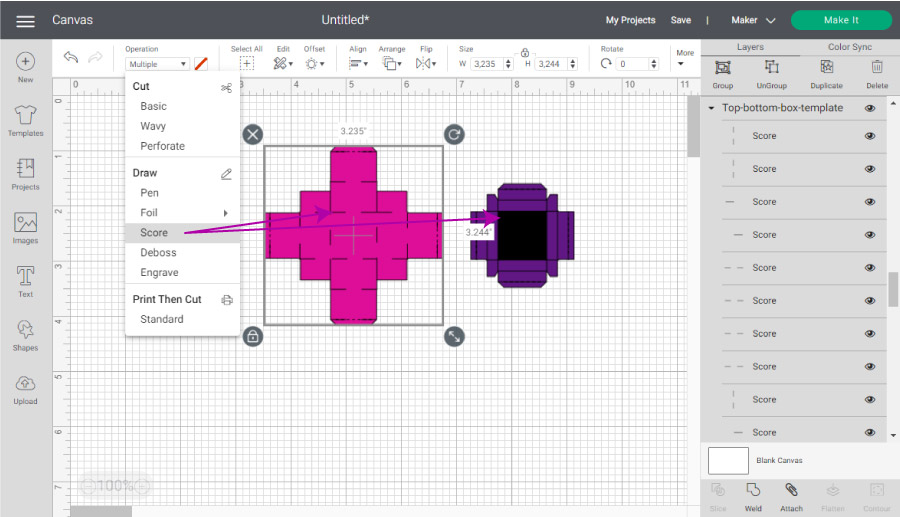
Alter Performance
All boxes in the world need to be folded in some way. As you lot may know, Cricut allows you to create cute folds in your materials to make your life and creations much more manageable.
In all of the templates I gave you, I grouped the lines that need to be scored. You will know they need to be scored because they are in black and beyond the whole design.
Yet, this box, in detail, is a little tricky because it has some lines that besides cut across the design. So, to find the score lines, click on the black foursquare of the middle and and so click on "Performance" – located on the top menu – and modify information technology to "Score."
Later on changing the "Operation," you will see that both pieces are at present appropriately scored.
Attach, Resize and Make it
In one case you lot are done scoring the lines, we need to assign them to the box.
You see, even if everything looks in order in the canvas surface area, the only way for everything to remain in the aforementioned spot is by attaching the score lines to the box template.
Select the elements that brand the bottom and click on "Adhere," located at the stop of the layers panel. Then, repeat the same thing, only this time with all of the elements that make the box's cover.
At this point, you can resize your box also. But make sure to ALWAYS increase both parts at the same time WITH THE SAME PROPORTIONS. Otherwise, the measurements will not lucifer, and your box volition be useless. Notation: This also applies to all of the other templates.
Subsequently you are done attaching and resizing, click on the "Brand information technology" button located in the upper right-hand corner of the canvas area.
Cutting Process
The post-obit screenshot is the window that yous will see after sending your box to be cut.
Newer machines volition ask how to load your materials. On a mat or without a mat. Select "On Mat" to follow along.
As yous tin can run across, in that location are ii dissimilar mats; one for each color. Initially, I idea I would use two different colors, but I decided to apply the same one. Since both parts fit in the same mat, I moved the tiptop role of the box to the pinkish mat.
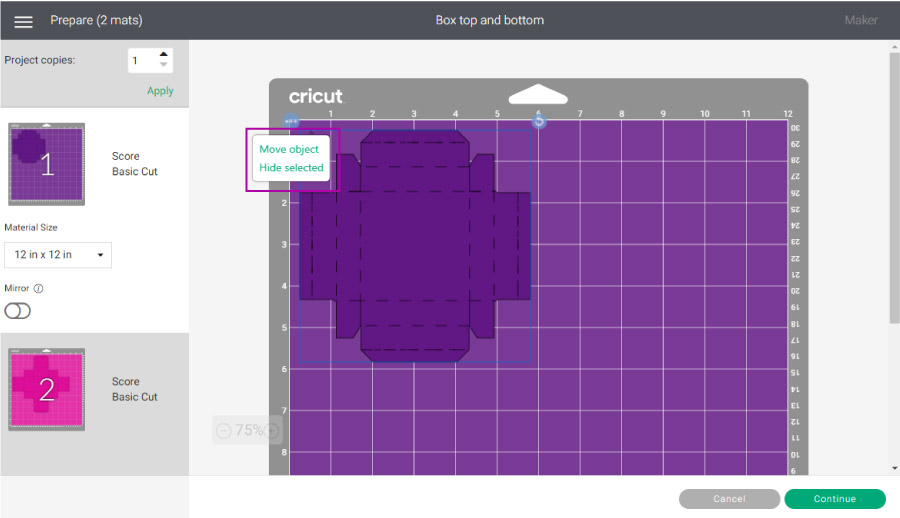
If you are using two different colors, you can just cut your box in 2 different mats like Cricut instructs – I do have an commodity on how to cut multiple colors on 1 mat likewise – or if using just one color and the box is minor plenty, give this technique a try.
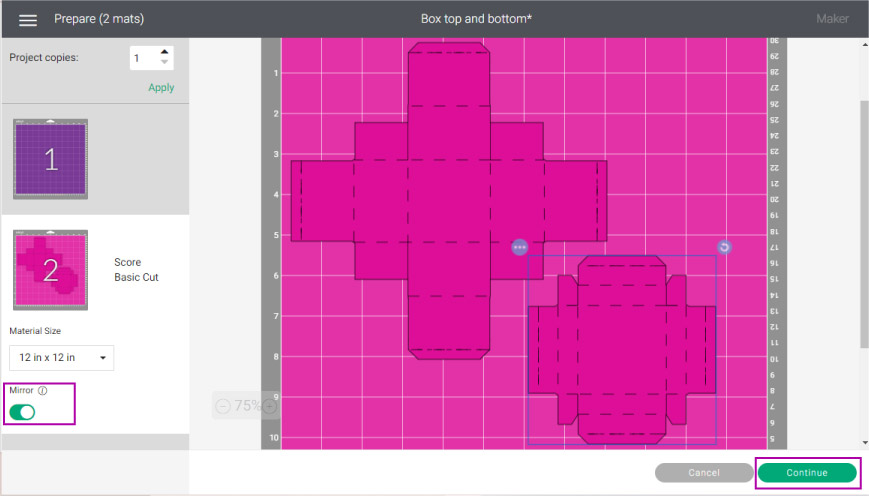
At present let's talk about the MIRROR and why it is ON.
In my how-to-use the scoring wheel article, I explain that yous demand to fold your materials towards them whenever you lot create score lines. So, if y'all are using one side coated materials like glitter card stock or patterned paper, you need to place your paper pretty side down on your mat.
Every single time y'all do this, you demand to turn your mirror ON. All the same, since this is a box and boxes are all the same mathematically, you won't have problems if you leave it on.
I recommend you to plow it ON because of habit. I day you may demand to cut something like fe and forget the importance of this concept.
Select Materials, Load Mat, Get
Now it's fourth dimension to select your materials.
If you lot take a machine with a "Smart Fix Dial," move information technology to "Custom" to select cloth from Pattern Space and follow along.
Get alee and select your material from the options that Cricut has to offer. If your fabric does non announced on the well-nigh popular options, you can browse all materials past keyword or alphabetically.
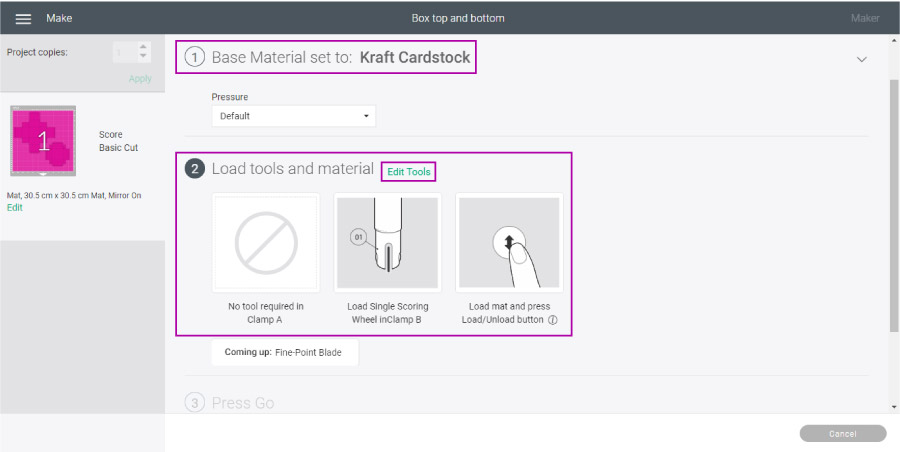
If yous are cut with any of the Explore Machines, the tools section volition prompt y'all to install the "Scoring Stylus" and the "Fine Betoken Blade."
If you have any of the Maker Machines, by default, you will have the bike. But if you want to apply the "Stylus," click on the "Edit Tools" to select the Scoring Stylus. Then, install it along with the "Fine Betoken Blade."
Note: Cheque this article I wrote on the Differences Betwixt the Stylus and the Scoring Cycle.
I decided to use the Scoring Wheel for this projection. If you are using the wheel as well, Pattern Space will prompt you to install the fine point blade when your Cricut is done Scoring.
Finally, after selecting Materials, installing tools in your machine, place material on your mat, load it, and printing the flashing GO push button on your device.
-

Identify Newspaper Pretty Side Down -

Load to mat for box to exist Score and Cut -

Remove newspaper by bending Cricut Mat

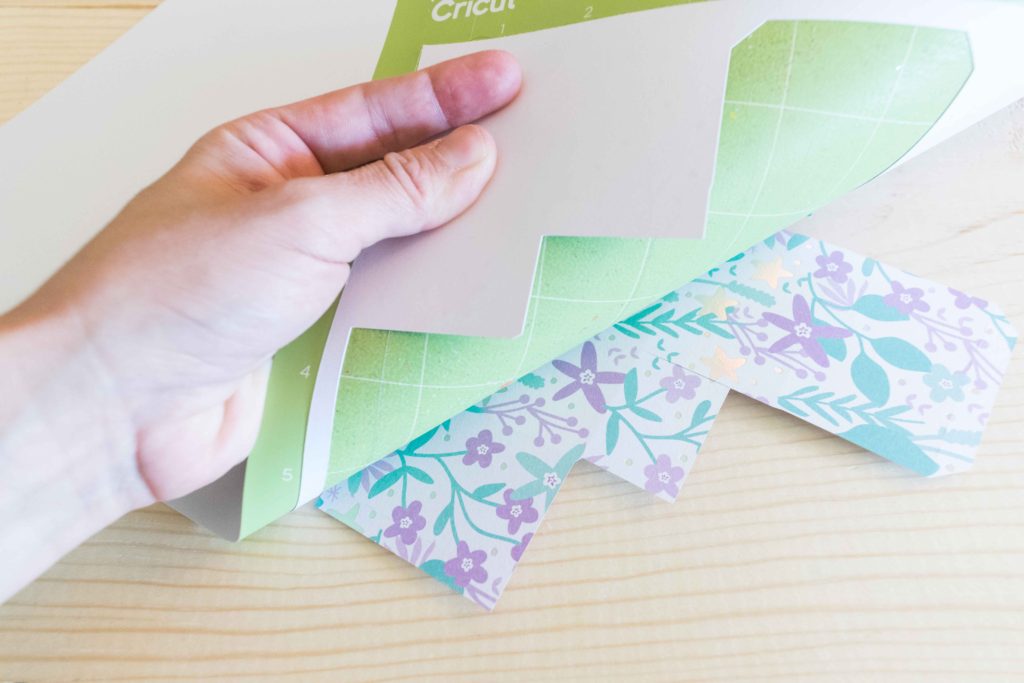
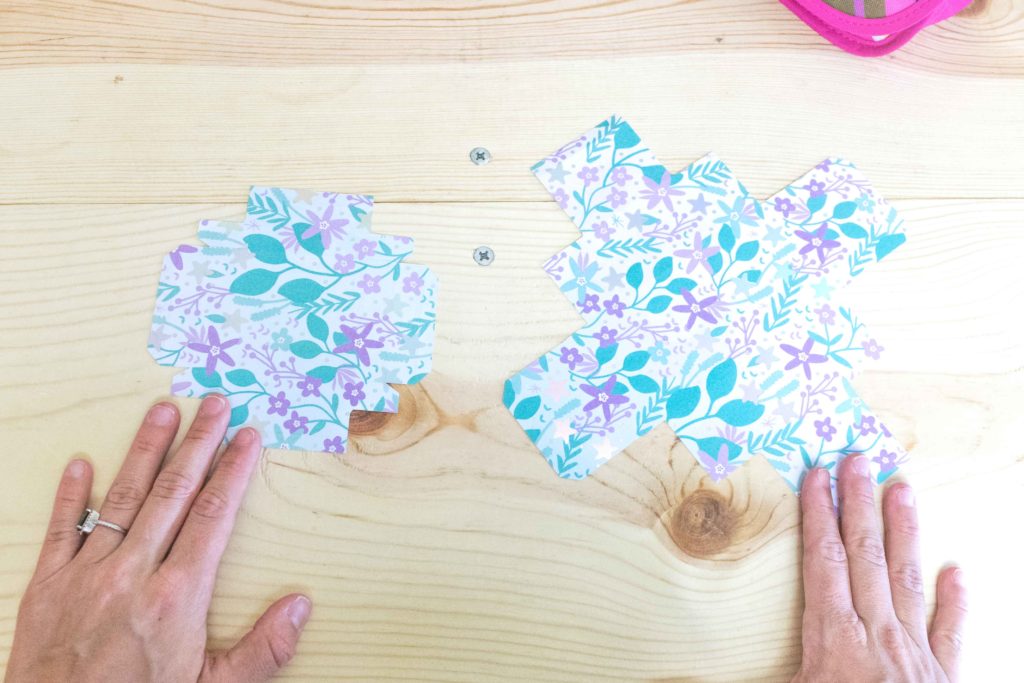
Later on you are done cut, you lot should be left with two different pieces. Remember, the big one is for storage, and the small ane is the box's comprehend.
-

Before Assembling -

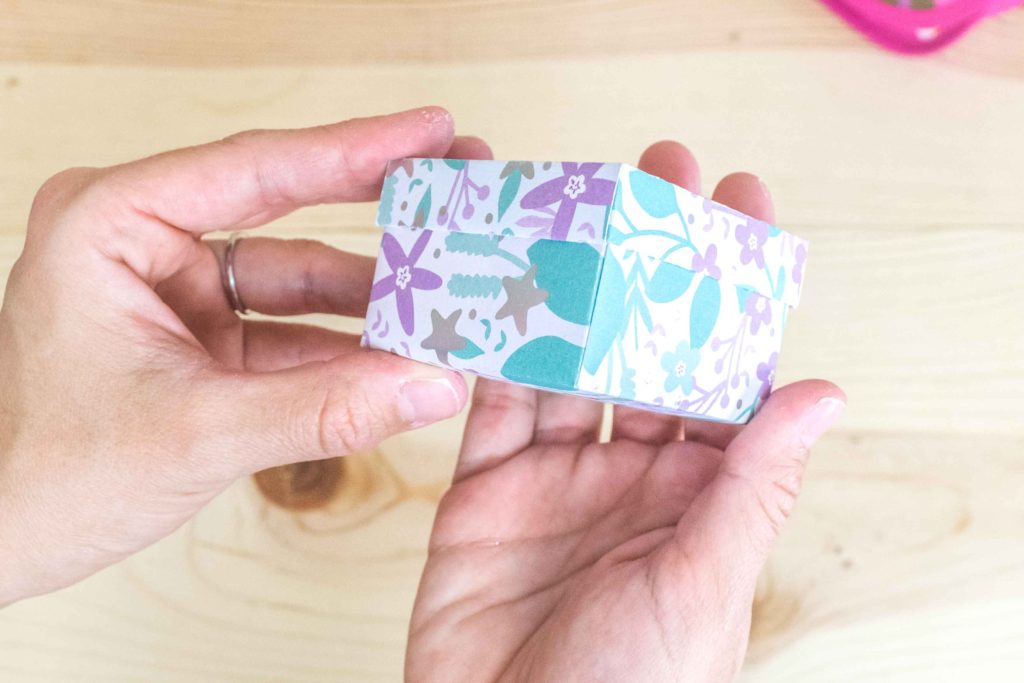
After Assembling
Now, allow'south encounter how to assemble this box!
How to Assemble Boxes subsequently Cutting with your Cricut
At the beginning of this post, I mentioned that I would merely exercise a step-by-pace of 1 of the vi templates (the top and bottom box I provided you with). But, I too said I was going to show you how to gather all of them.
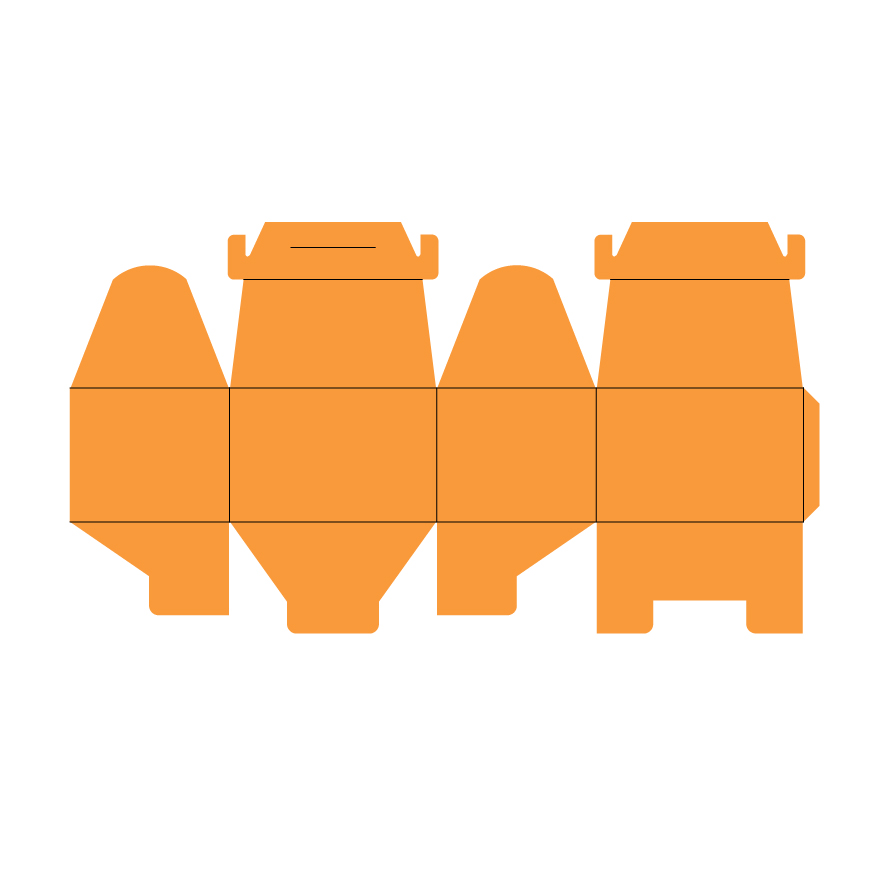
Tiptop & Bottom Box Assemble Process
This box is perfect for small gifts, and it'due south but ambrosial!
I love this blueprint because it doesn't require glue at all when using thick materials like glitter cardstock or poster board. If you lot use a sparse material, you lot tin apply a piddling glue or record to secure it.
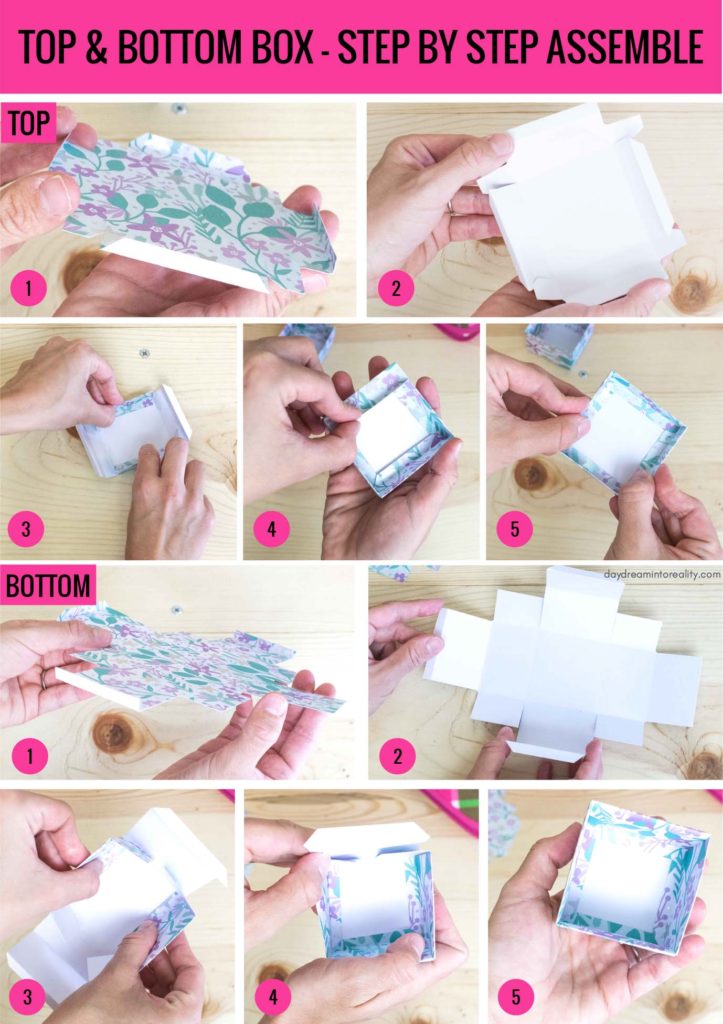
Top – Embrace
- Fold all 4 outermost tabs out.
- Fold the residual of newspaper towards the score lines.
- Fold the 2 sides in with square corners first, then fold in the iv picayune taps
- Fold the two angled sides in to complete cover.
- If your are using very thin materials y'all may want to secure angled taps with glue or tape.
Bottom – Storage
This office is essentially the aforementioned process every bit the tiptop but with a larger surface surface area.
- Fold all four outermost tabs out.
- Fold the rest of the paper towards the score lines.
- Fold the two sides in with square corners first, then fold in the four little taps.
- Fold the two angled sides into a complete cover.
- If your are using very thin materials you may want to secure angled tabs with glue or tape.
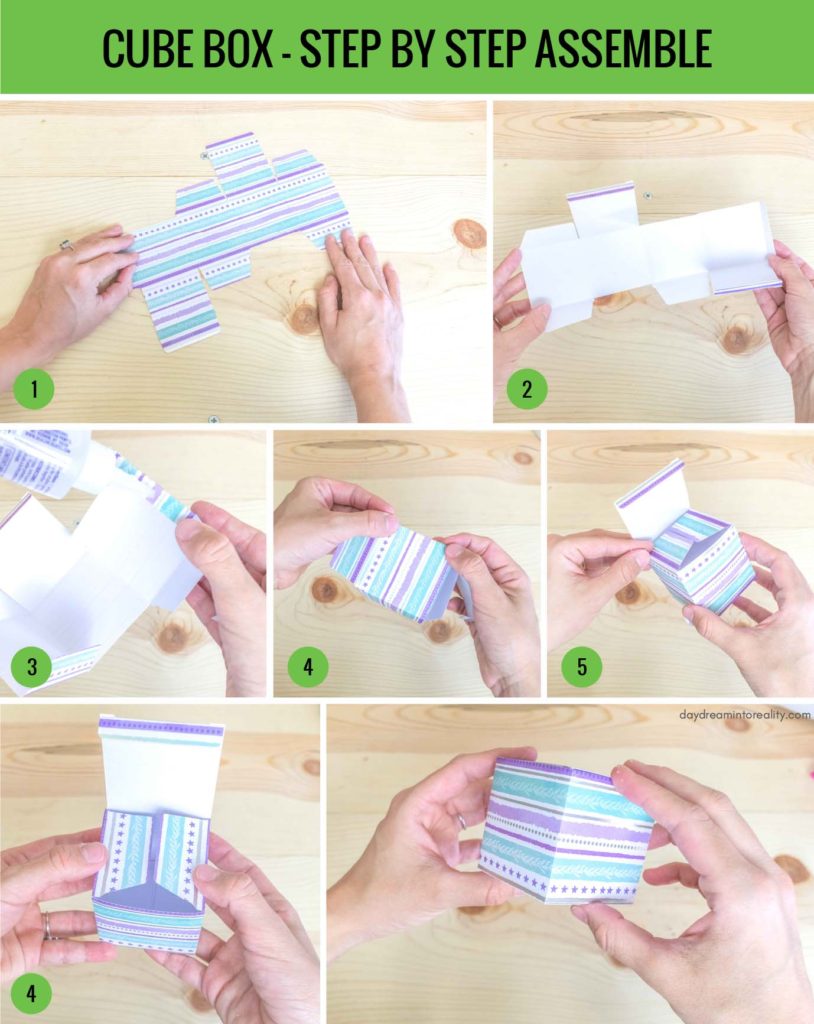
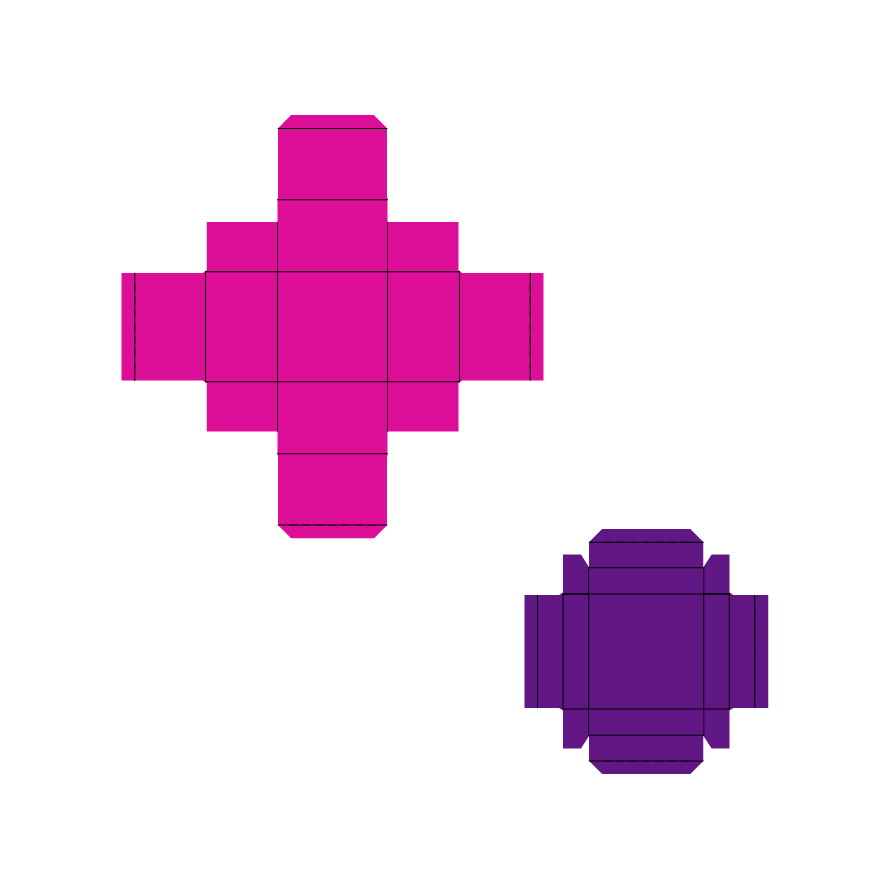
Cube Box Get together Process
This is the EASIEST box to get together! Yous can add actress touches to this type of box to make information technology actress cute as well. For example, you can employ some ribbon to add together a bow on top of the box.
- Take a expect of the final cut and then you tin can meet the logic of the box itself.
- Fold paper towards the score lines. This will also requite you a better idea of the final box construction.
- At this point y'all should take the little outermost tab folded in. Apply glue to the patterned side and attach it to the other side.
- Press tight until glue is dried.
- For the bottom, fold the two small sides in, and so tuck the remaining tab to close the box.
- For the pinnacle, echo what you did on step number 5.
Lunch Box Assemble Procedure
The Luncheon Box is the biggest box of all! If you want to create a fair-sized one, you must use a 12 past 24 inches Mat.
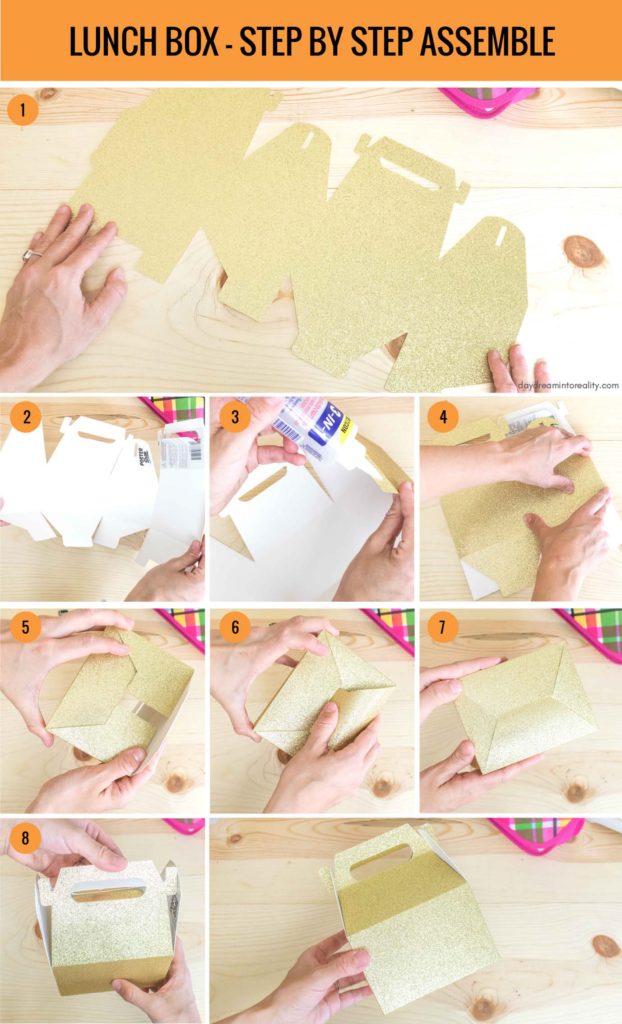
- Take a look of the terminal cut so you tin come across the logic of the box itself.
- Fold the newspaper towards the score lines. This volition besides requite you a ameliorate idea of the last box structure.
- You should accept the little outermost tab also folded in at this point. Apply glue to the glittered side and adhere to it the other side.
- Press tightly until the glue is dried.
- For the bottom, fold the large rectangular tab in showtime, so the ii small side tabs.
- Finally, fold and tuck the big angled tab into the slot establish on the large rectangular tab.
- Make certain it looks but like the photo I prove you lot on the step by step.
- For the top, hold the ii wider sides together to consummate the handle. And so latch the side hooks of the handles with the narrow sides. Note: Use the niggling flaps in the handle to close the box.
Foursquare Petal Box Assembly Process
This box may seem tricky to assemble. It took some practice for me to get information technology correct, so don't exist frustrated.
Recall, practice makes perfect!
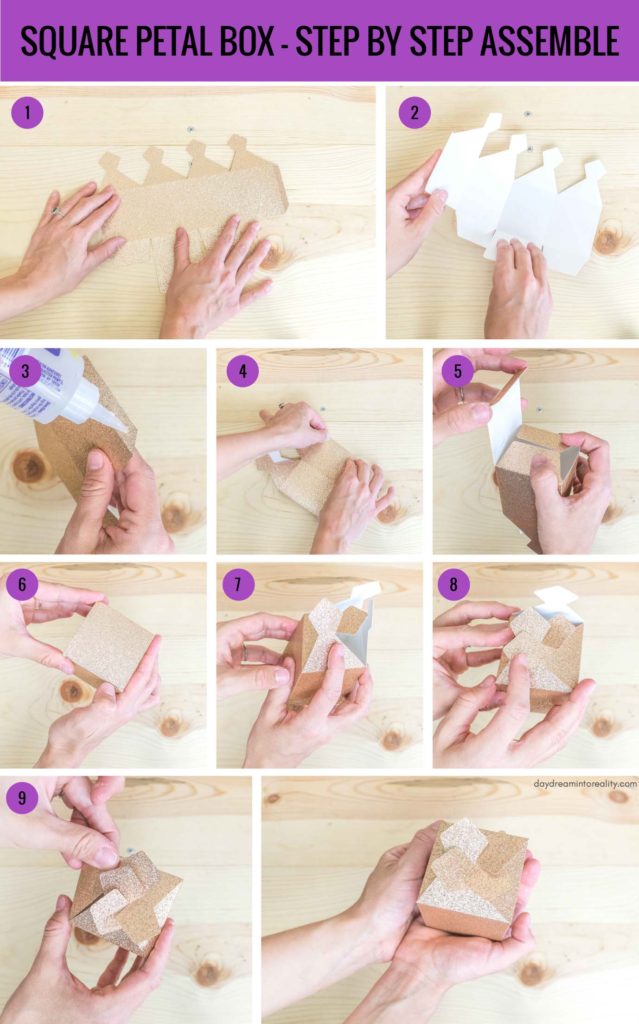
- Take a await of the final cut and so you can see the logic of the box itself.
- Fold paper towards the score lines. This will also give you a improve idea of the final box structure.
- At this bespeak you should have the little outermost tab folded in . Apply gum to the glittered side and attach information technology to the other side.
- Press tight until glue is dried.
- For the lesser, fold the two small sides in.
- Now you tin close the box past tucking in the remaining tab.
- For the top, take hold of any of the iv remaining tabs and fold in halfway through.
- Then, take hold of the tab to the right of the folded one and tuck the petal underneath it.
- Continue that process counter clockwise until all tabs are folded in and await like the final photo in the step past step graphic.
Candy Wrap Box Assembly Process
This is one of my favorite boxes. However, something extraordinary happened when using the scoring wheel on this material.
I think honesty is essential. I was about to repeat this box on other textile, but I like to be honest with you so y'all tin make an informed selection.
I used a very fine glitter card stock for this particular box, and when I used the scoring wheel tip 02, most of the glitter stayed on my Cricut mat. You lot tin see this on pace 1 of the graphic down below.
I tried using the 01 tip for another box and this aforementioned material, and it happened as well, but not that noticeable. I honestly don't mind. I actually similar the consequence, just if y'all want fine glitter paper, make sure to test before you create a large project.
Now let's go to the step past stride!
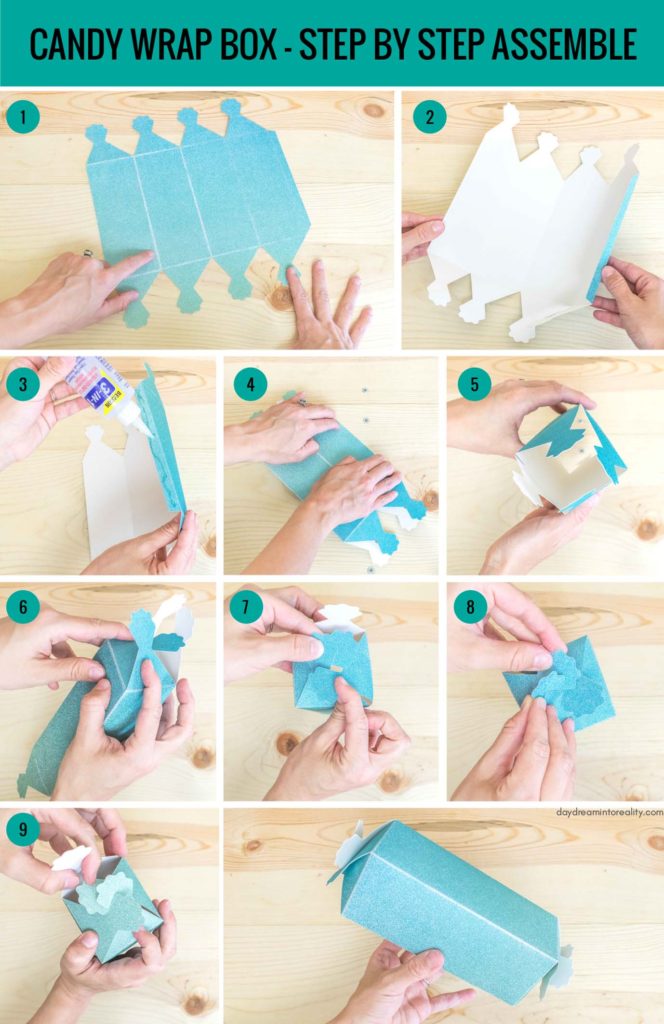
- Accept a look of the final cut then you can see the logic of the box itself.
- Fold newspaper towards the score lines. This will likewise give you a better thought of the final box structure.
- At this point you should accept the little outermost tab folded in. Utilize glue to the glittered side and adhere it to the other side.
- Press tight until glue is dried.
- Open the box to form tiptop and bottom parts.
- For the top, grab any of the four remaining tabs and fold in halfway through.
- Then, catch the tab to the right of the folded one and tuck the tab underneath it.
- Continue that process counter clockwise until all tabs are folded in and look like the final photo in the footstep by step graphic.
- For the lesser, repeat the same process, you did for the acme, but this time work clockwise.
Pillow Box Get together Process
Pillow boxes are then easy to brand, and they are perfect for small presents. In fact, I am planning on making earrings for my friends and family and gifting them in these niggling boxes.
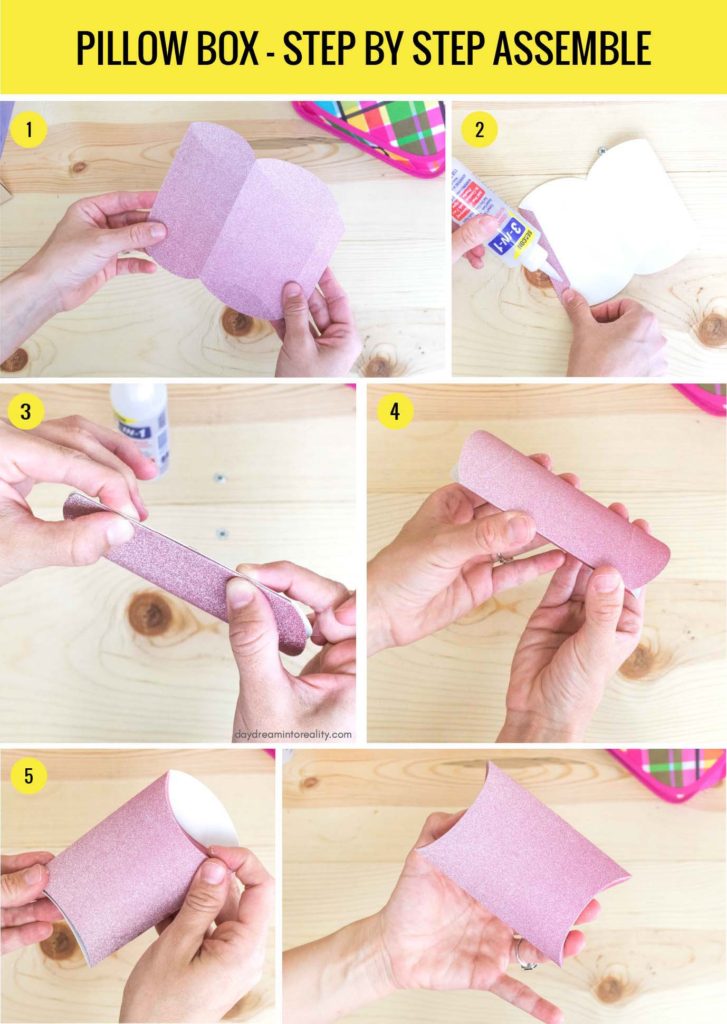
- Take a expect of the final cut then you lot can see the logic of the box itself. Then fold paper towards the score lines.
- At this point you should take the little outermost tab folded in. Utilize mucilage to the glittered side and attach information technology to the other side.
- Press tight until glue is dried.
- Open the box to requite its shape
- For both peak and bottom push both curved tabs. One on tiptop of the other one.
Complimentary SVG Boxes Templates
These box templates are organized in a way where score lines and cutting lines are grouped so that you can alter the "Operation" very quickly.
To download the files, you Need to be on a desktop or laptop, and y'all must click on the button to trigger a download file on your pc.
Depending on your browser settings, sometimes your PC will ask where to save the file, although, almost times, the files volition exist in your download folder.
If the paradigm opens in a new window (this may happen because of your browser settings), right-click on it, select the option "Save Prototype As," and choose where you want to salve the file.
SVG files look like a web page file when you download them.


NOTE: These files are ONLY FOR PERSONAL employ, and delight do not upload them to other blogs or whatsoever social media platform. It took my dad and me over two weeks of work to bring these resources to you.
Oh!
And just so you know, I also have a library total of free SVG files and Printables for all of my subscribers, a.k.a Daydreamers. You can see a preview correct here or go access by filling out this form.
Quick Summary
Materials
- Glitter Cardstock (Or whatsoever other sturdy material of your preference)
- High Quality Glue
Tools
- Cricut Maker or Explore
- Scoring Bike / Scoring Stylus
- Fine Point Blade
- Standard/Strong Grip Mat
Instructions
- Upload Template to Cricut Design Space.
- Change Cutting lines for Score lines to make folds
- Select all of the elements on the sheet, adhere, and click on Brand it
- If using one side coated materials similar glitter or metallic newspaper plough the mirror ON. Click Continue
- Select Materials from Pattern Space if you have. If using a machine with Smart Set up Dial motion it to "Custom."
- Place Material on Mat* and load it along with Scoring Tool and Fine Point Blade**
- Press the flashing "Get" push button and when the cutting is set up unload Mat
- Remove cutting from the mat and gather box
Notes
*If using one side coated materials identify material pretty side down.
**If you are using Scoring Stylus you lot tin Score and Cut without any intervention. However, if you are using the Scoring Wheel, you will need to install this tool outset and wait for Cricut Design Space to tell you when to install Fine Bespeak Bract.
Source: https://www.daydreamintoreality.com/make-assemble-boxes-cricut/
0 Response to "How to Make a Baby Gift Out Shoe Box"
Post a Comment